I have so many bags and each has a specific purpose. But I didn't have a bag the right size to carry around my hand sewing stuff when I wanted to take it with me. Something big enough to bring my scissors, thread, and everything else in. But also small enough to fit in my purse as well! The finished dimensions are 4.5 by 6.5.
If you want, you can make the side string longer to fit around your wrist, but I wanted a small carabiner on mine so I can clip it onto my big bag (which is also purple).
Supplies
4 7 x 5 inches (Cotton: you can do different for the inside if wanted)
1 11 x 5 inch (Cotton)
2 1 x 3 inch (Cotton)
2 7 x 5 inches (Warm & Natural)
1 7 inch piece of ribbon (1/2 inch wide)
1 4 inch piece of ribbon (1/2 inch wide)
1 6 inch zipper
Take the 11 x 5 inch piece of material, mark a line across the 11 inch side 1 3/4 inches from the bottom. Mark 1/2 inches away from that line as well. Sew across those two lines with a loose/far apart stitch (also known as a basted stitch).
Pin down the two sides of the material to one piece of the Warm and Natural batting. Pull one of each of the basted stitches (holding onto the strings on the other end) causing the material to gather. Keep pulling until the material lines up with the other side of the Warm and Natural batting.
Pin down the other side and spread out the gathering so it's even. Pin down the 7 inch piece of ribbon on top of the gathered material (right on top of the basted area. Sew down the ribbon on the top and the bottom. It should look like the picture above. Take your iron and lightly press the ruffles down. You want texture here, so don't be afraid of a lot of folds.
Zigzag along the edges to hold everything down for the final sewing. Also, zigzag the outside back piece of cotton (7 x 5) to the other Warm and Natural batting piece.
Iron 1/4 inch of each (2) end of the 1 x 3 inch cotton down. Then fold the piece in half and iron it as well. Pin each piece to the ends of the zipper and sew them into place with a 1/8 inch seam allowance.
Lay down the front piece (good side up), the zipper (bad side up), and the inner lining (bad side up). Pin all three together and sew with your zipper foot. Flip the pieces around so the zipper is outside, with the two sides correctly out. Iron.
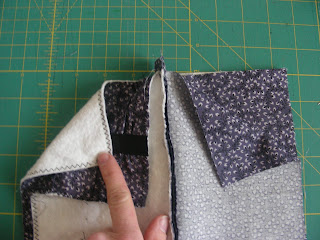
Lay down the back piece (good side up), the piece you just ironed with the front side facing the back (zipper should be down), lay the inner lining on top of the rest (bad side up). Sew across with your zipper foot. Flip the pieces inside out and iron them so the zipper is in the middle (like below).
Fold the piece of ribbon in half and iron. Pin the ribbon onto the edge of the back piece (about 1/2 inch from the zipper).
Fold the material so the front and back are together, and the two lining pieces are together. Make sure the zipper is unzipped inside these pieces or you'll have a hard time getting it open later. Pin around the edge of each.
Sew completely around the front and back piece. Sew the two sides and part of the bottom of the lining, leaving a 3 inch gap in the center of the bottom. Make sure you back stitch before and after the gap. Flip the bag inside out, through the 3 inch gap. iron everything down and into place. Using a blind stitch, sew up the 3 inch gap! Vola! You're ready to use your new bag.


No comments:
Post a Comment