Friday, November 2, 2012

Halloween Costumes


Last minute my husband asked me to pull together a costume for him. Since I had made a Alice in Wonderland costume for myself several years ago, I stuck with the theme and made him a Mad Hatter costume. Happy Halloween!

Wednesday, October 31, 2012

Reuseable Swiffer Sweeper Pad

My husband is obsessed with Swiffers. I don't know why. I don't even think he's used one before. But ever since we got married he's begged me to buy one. Four years later I found a coupon for $5 off, so I caved and bought him one. I never wanted one because it only does a good job on wooden floors (only in our kitchen and bedroom), it's not really for sweeping, just for cleaning up dust and you have to buy those replacement towels every time you use it. What a waste of resources and money!


I must admit, it works better than I expected. It removes the dust from wooden floors pretty easy. So I decided to use a fraying towel to make a reusable Swiffer pad. This isn't really rocket science. You could just use any rag that was big enough, but I'm OCD, I need one the right size.

 Supplies:
Old towel


Cut off the top of the towel right down to the accent line (if you don't have an accent line, don't worry about it)


This is the line I'm talking about. Also can you see why this towel became a scrap? I thought name brand towels would have lasted longer... Oh well, won't buy them again! Cut a square 9 inches by 11 inches, with the decorative line across the 11 inch side. You can cut as many as you want (I did two, because I wanted a spare if the first one is already in the laundry).


Zigzag (or surge) around the edge of the towel, and you're done! The reason I like having the decorative line across the top is for ease of gripping when you push it into the holding compartments of the Swiffer.


See how nice it fits into place? Now you're ready to dust off your wooden floors. So have at it! Or you can come do my house. I don't dust anything nearly as much as I should.

Monday, October 29, 2012

Friendship Square


The friendship square (above) also uses the Triangle Square Up Ruler to create. We used the ruler last week to create our Pinwheels. You could do this without the ruler, but it would be harder. Wouldn't these squares make a cute baby quilt? It would be work, but worth it!

Supplies (for one square):
4 different colors of material (cut into 3 1/2 inch squares)
1 neutral material like white or cream (cut into 4: 1 1/8 by 3 3/4 inch rectangles)


Lining up your quarter inch ruler so the center line lines up with the corners, cut off one side of the triangle (so it's got an extra quarter inch on one side).


Pin a rectangle on the diagonal of the triangle (centered), and sew across the edge.


Iron the seam with the material in one direction for the two colors that will be diagonal, and the opposite direction for the other two. Sew the second triangle onto the back of the rectangle and sew across the line.


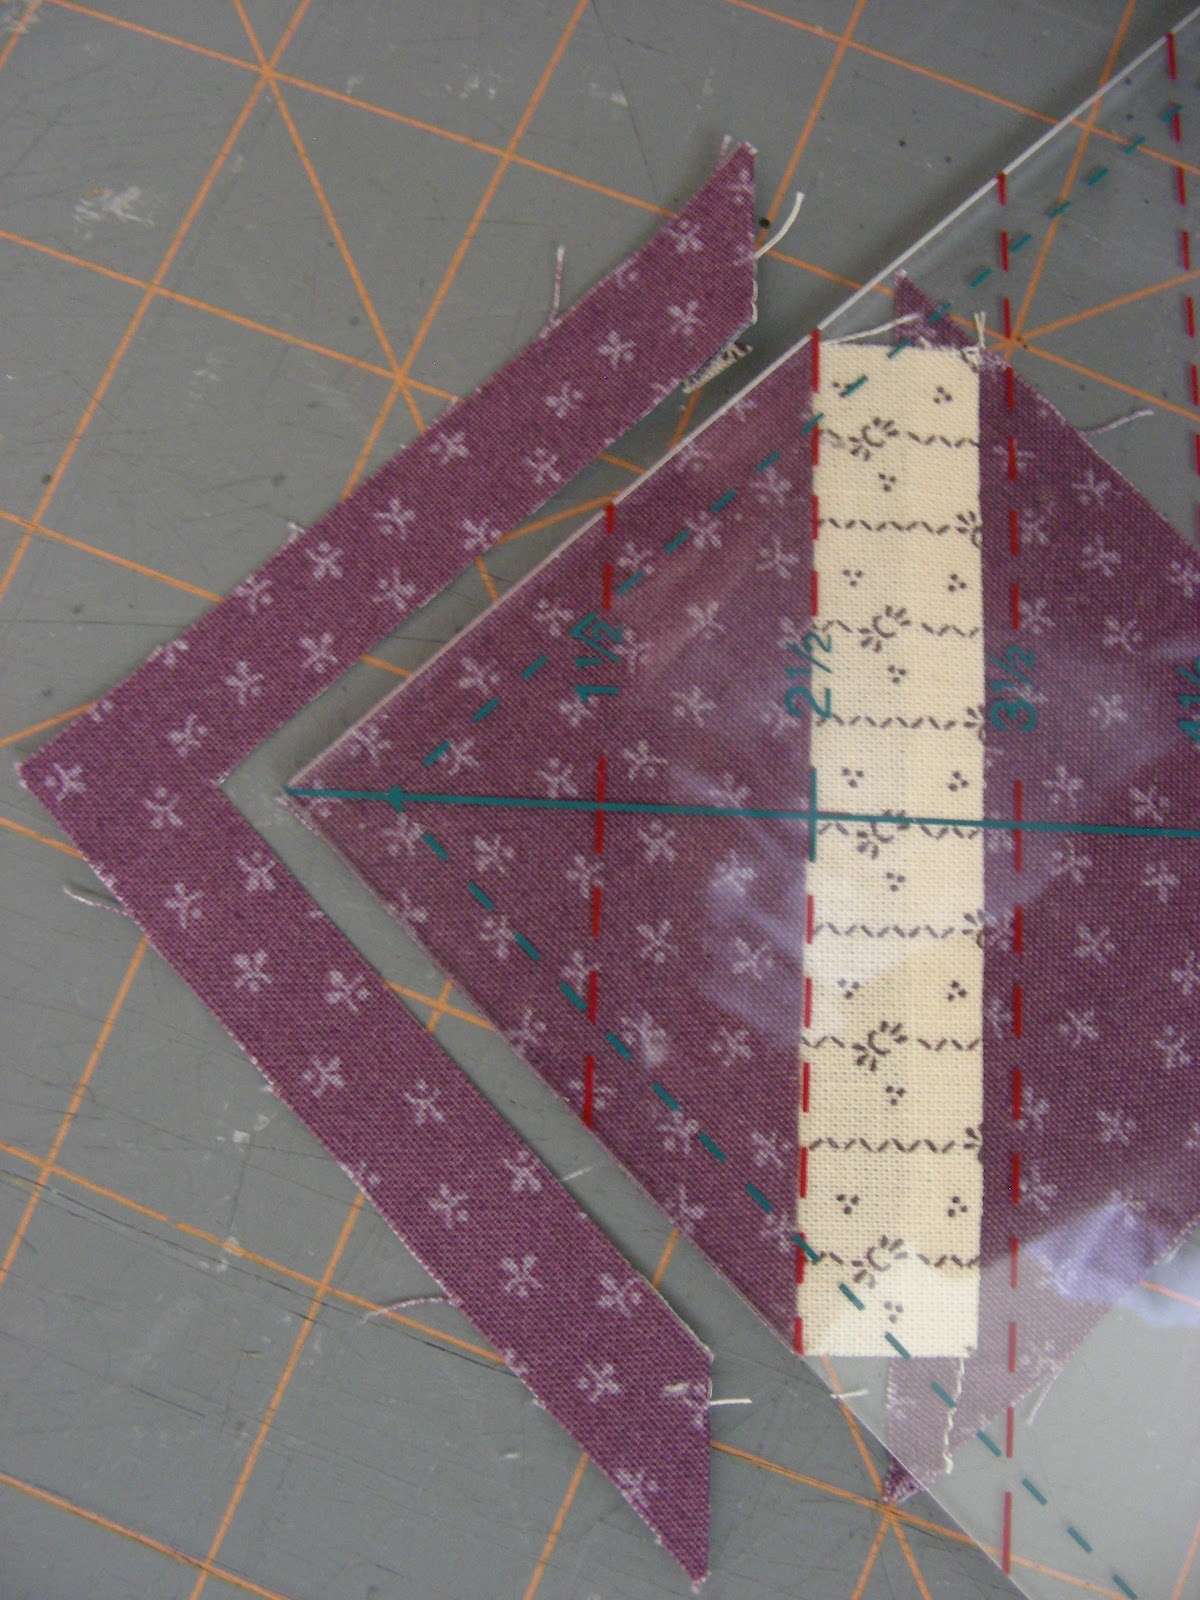
Line the ruler up with the big side of the square. Line the seam of the triangle and rectangle up with the 2 1/2 inch line on the ruler. cut off the excess material. Now flip the square over and line the ruler up with the same seam. You will notice the white takes up most of this half of the triangle, and the color is a smaller section of this half. Measure a few times if you need to, just to make sure you did this right.


Sew the four pieces together and you have a Friendship Square!


Friday, October 26, 2012

Easy Pinwheels


 I've been working on my square a month quilt again lately. This month we did two that required the same ruler, and it's a really cool one! It's by the company "Quilt in a Day" and you can get the ruler for around $15 on Amazon. It's called the Triangle Square Up Ruler.

Supplies:
Light material (2 pieces 2 inches square)
Dark material (2 pieces 2 inches square)


First, line up your light and dark material on top of each other with the right sides facing in (wrong sides out). Mark and measure a quarter inch from the center diagonal line on both sides. I like to mark the center too (so you know where to cut later). 


 Pin the material together and sew along the two outside lines (leaving the center for cutting). Cut along the center line to separate the two sections.


 Using your Triangle square up ruler, line up your seam with the 2 inch line and cut off the excess material.


 Press your squares open, with the seam going towards the darker color. Line your 4 squares up in a pinwheel formation. Pin the top two and bottom two together and sew. Again, press the seams towards the dark color. 


Pin the top to the bottom piece and sew the pieces together. To iron, we're going to "pop the seam". Grab the two sides of the material you just sewed and twist the material in opposite directions. You'll notice some of the seams are pulling out and a design (like the one above) shows up in the middle. That means you're doing it right!


Now iron the tow sides towards the dark color again. This will give you a very uniform back. But we're not doing this just for looks, we're doing this so the square lays flat. It's just less bulky this way!


Now flip your square over and you've got your completed square.


You can do all kinds of things with these pinwheels. They make cute baby quilts, or whatever you want! You can use this ruler to make anything you need a half square for. Or you don't have to use the ruler at all. You can also do it by hand. Next week I'll show you another way to use this ruler.

Wednesday, October 24, 2012

Hand Quilting my Second Quilt ever


What am I working on this week? Watching Harry Potter to prepare me for Halloween. And hand quilting my second quilt ever. It's my first time hand quilting. It's slow going, but turning out well. It's been a fun process to learn. I like how it's turning out so far too.


I started this quilt two years ago. It took me a year to make the top, and it's taken me a year to hand quilt so far... Hopefully it won't take me another year to finish!

Monday, October 22, 2012

Adding a leaf to the Yo-Yo


 Last week we learned how to make a Yo-Yo. Now I'll show you how easy it it so make and attach a leaf to the Yo-Yo to make it look like a flower. If I had a daughter, these would become hair clips, pins to go on clothes, etc. But I have a little guy who wouldn't appreciate being covered in flowers.


First, take the outside of the Yo-Yo maker and trace a circle. Cut it out, then cut it in half (this will make two leaves.


Sew across the top. I only did it by hand because I didn't feel like plugging in and setting up my machine just to sew on line. My son tends to get into my machine if I don't put it away after each use... Anyway, if you sew by hand make sure you tie off before the next step.


Flip the leaf inside out, and sew along the bottom (unfinished edge) of the leaf. You want to do this one by hand.


Pull the string tight, gathering up all the material. Sew above where you just sewed to strengthen the sewing. You can do this more than once if desired.


Now attache the leaf to the back of the flower, sewing down several times to give it strength.


Flip it over and you're done! You can attach these to a jacket, dress, headband, clip, or anything you desire. Or just stick it in your pin cushion to make you smile. That's where mine is sitting right now. I'll figure out what to do with it later.

Friday, October 19, 2012

Making Yo-Yos


I got together with my mom this week to start making stuff to give away for Christmas. It may sound early, but we like to get as much done as possible before November so we can not only enjoy Thanksgiving, but also Christmas. 

So we put together some bags with a cute little Yo-Yo sewn on the tie to fill with candy and other goodies (when we get around to baking). So I wanted to feature the Yo-Yo maker we used to make these bad boys!


 We used the Clover Round Yo-Yo maker in size Large. They have three different sizes you can choose from, I make the purple on in the small size. First cut out a square 3.5 inches. Stick your Yo-Yo maker on both sides of the material and click it into place. Test that it lined up by sticking a pin through one of the holes.


Trim off the excess, leaving about 1/4 inch around the circle.


 Fold down the back material, and (starting from the back) sew in and out of the holes. You will notice you want to come up and down on the front so the string lines up with the gap in the plastic. Sew a second time over the first stitch you made.


Pop the tool out and gently pull the center out. Pull the string tight, making sure your edges stay in the middle so you only have a finished edge showing.


Completely pull it together, sew around the end a second time, and push the needle through the bottom to tie it off. Vola! You've got your completed Yo-Yo. Next week I'll show you how easy it is to make and attach the leaf.